Hello! This post somehow got a lot of attention. Thanks for visiting! If you like it, it would be awesome if you’d check my app Findings, a lab notebook app for scientists and researchers, and let others know about it.
An app is not just made of code. It also contains static assets like images and sounds. Images are typically created and edited with dedicated tools like Acorn (my favorite), Pixelmator, or the 800-pound gorilla, Photoshop. Ideally, the graphics are handled by an actual designer, which really is one of the best things we did for our app Findings. But as a developer, it can be tedious to have to use a separate tool or involve another person, when all you need is a simple little icon with just a few straight lines, a square or a circle. Because of “retina”, you also have to create separate files for 1x, 2x, and now 3x-scale versions of the same drawing. Any small change or the addition of small variants can quickly become a cumbersome and error-prone endeavour.
![]()
I am a programmer, I can surely draw those in code!
What’s a developer to do? Write code! I don’t remember the first time I decided to draw an image directly in code, but that seemed like a good idea at the moment. From a developer’s perspective, it is very tempting. Why use Photoshop when you have the most flexible tool ever: code? Photoshop was written in code, so whatever Photoshop is doing, code can do! Alas, in practice, this is only a reasonable approach for very simple graphics. And even then, it is not a straighforward task, and it is not quite the amount of fun I had naively hoped for. I will first show you an example of what it entails, but fear not, I also have an alternative fun solution right after that.
Way too much code
As promised, here is an example of one of those first times I actually drew an image using Objective C. Brace yourself:
1 2 3 4 5 6 7 8 9 10 11 12 13 14 15 16 17 18 19 20 21 22 23 24 25 26 27 28 29 30 31 32 33 | |
Wow, that is a lot of code for just drawing two lines at a 90-degree angle! And that is not even including the actual NSImage code. It is nice that I can easily change the color and the size, and that I get 1x, 2x and 3x in one go. But was all this code really worth the trouble? After this first experience, I was not sold, but still used that approach in a few more occasions, where very simple graphics were needed. It got a little easier as I gained experience, and the invested time paid off, but I remained frustrated by the situation. After a while, though, I realized that the most interesting part of the code was actually the ASCII art I was using as a guide to my drawing code:
1 2 3 4 5 6 7 | |
This “drawing” described very nicely what I wanted to do, better than any comment I could ever write for any kind of code, in fact. That ASCII art was a great way to show directly in my code what image would be used in that part of the UI, without having to dig into the resources folder. The actual drawing code suddenly seemed superflous. What if I could just pass the ASCII art into NSImage directly?
ASCIImage: combining ASCII art and Kindergarten skills
Xcode does not compile ASCII art, so I decided I would write the necessary ‘ASCII art compiler’ myself. OK, I did not write a compiler, but a small fun project called ‘ASCIImage’! It works on iOS and Mac as a simple UIImage / NSImage category with a couple of factory methods. It is open-source and released under the MIT license on GitHub. I also set up a landing page with a link to an editor hacked together by @mz2 in just a few hours during NSConference: asciimage.org.
It is very easy to use and has limited capabilities. It is not just a toy project, though. I have been using it in a real app for the past year: Findings. But whatever you do, here is a good rule of thumb: as soon as you feel limited by it, you should fire off Acorn instead, or better yet, contact a designer.
Here is how you would use ASCIImage, to draw a 2-point-thick chevron:
1 2 3 4 5 6 7 8 9 10 11 12 13 14 15 16 17 18 19 20 21 | |
And below are the images that will be generated depending on the drawing environment:
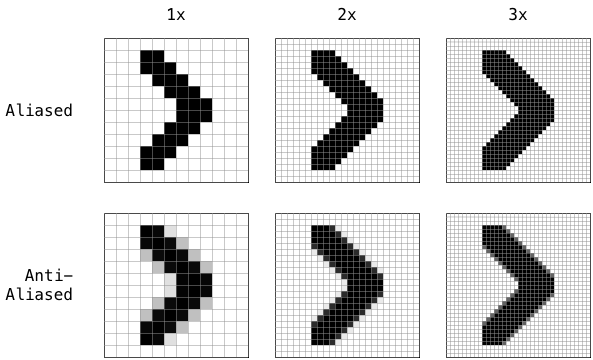
On iOS, the 1x/2x/3x versions will be generated based on the screen resolution of the device on which the app is running. On the Mac, the ASCIImage implementation uses the NSImage block API, which means the drawing will happen at the right resolution the moment the image is rendered on screen. Note that I disabled anti-aliasing in the example code (so only the images on the top row will be generated as needed). For this kind of shape, the rendering is actually sharper and looks better without anti-aliasing.
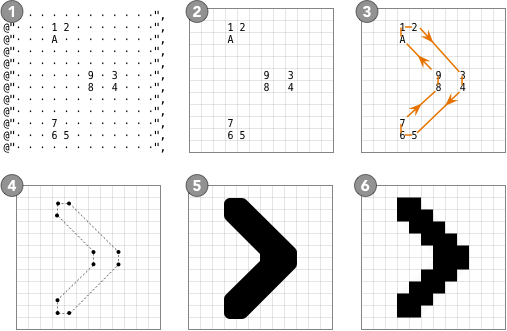
Behind the scenes, ASCIImage is doing simple, boring stuff. There are probably ways to make the parsing smarter and more user-friendly, but I just wanted things to work quickly without too much fuss and too much coding and debugging:
- it strips all whitespace; this is why all pixels need to be marked somehow (I chose the character ‘·’ as the background in the example above);
- it checks consistency: all rows should have the same length;
- it parses the string to find digits and letters; everything else is ignored, namely the ‘·’ and ‘#’ characters in the example;
- each digit/letter is assigned a corresponding NSPoint;
- it creates shapes based on the good old “Connect the Dots” technique you learnt in Kindergarten;
- each shape is turned into NSBezierPath;
- each Bezier path is rendered with the correct color and anti-aliasing flag
In the chevron example, there is just one shape, which is created and rendered as follows:
Basics
Here is a quick overview of ASCIImage usage. The valid characters for connecting the dots are, in this order:
1 2 3 4 5 6 7 8 9 A B C D E F G H I J K L M N O P
Q R S T U V W X Y Z a b c d e f g h i j k l m n p
q r s t u v w x y z
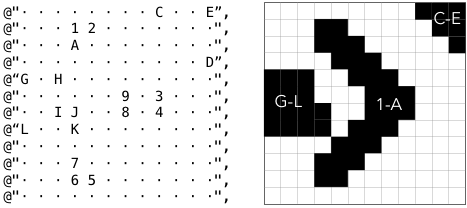
Each shape is defined by a series of sequential characters, and a new shape is started as soon as you skip a character in the above list. So the first shape could be defined by the series ‘123456’, then the next shape with ‘89ABCDEF’, the next with ‘HIJKLMNOP’, etc. The simplest method +imageWithASCIIRepresentation:color:shouldAntialias: will draw and fill each shape with the passed color (there is also a block-based method for more options). Here is an example with 3 shapes:
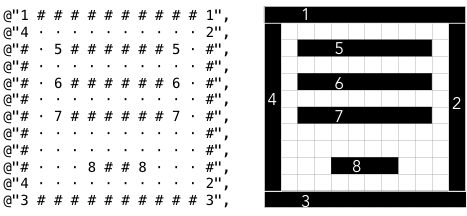
You can also draw straight lines by using the same character twice. In this case, you don’t need to skip a character before the next shape or line. Here is an example with a bunch of lines (remember, the ‘#’ are only here as a visual guide for when you look at your code, but are ignored by ASCIImage’s parser):
And you can combine shapes and lines, of course:
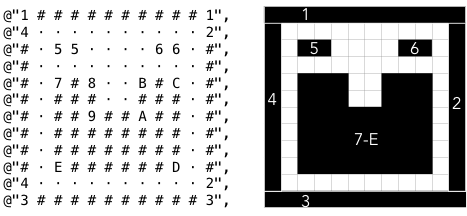
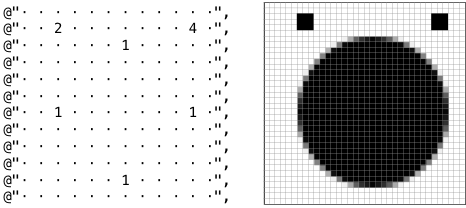
There are just 2 more special cases. You can create a single (square) pixel if you use an isolated character. And you can draw an ellipse by using the same character 3 or more times. The ellipse will be defined by the largest enclosing rectangle for the points. If the rectangle is a square, the ellipse is a circle:
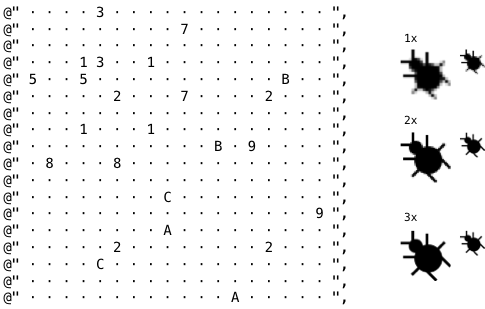
And finally, a more elaborate composition showing how far you can get with it. This particular ASCII art is entering obfuscation territory, which clearly defeats the purpose. The fun is still there, though!
That’s it for the basics!
Bells and whistles
There is a second factory method defined in ASCIImage:
1 2 3 4 5 6 7 8 9 10 11 12 13 14 15 16 | |
This method allows you to apply different settings to the drawing of each element of the graphic. This is done via a mutable dictionary used as an argument in a block. Information goes both ways: from ASCIImage to you, and then from you to ASCIImage. You get the shape index (ordered based on the characters used in the ASCII art), and you set a stroke color, fill color, antialias flag, etc. Note that this context has not much in common with an actual NSGraphicsContext. It is very limited, and unfortunately, it is not possible to directly manipulate NSGraphicsContext for the kind of drawing ASCIImage needs to do (or at least, there were enough gotchas that I decided against it).
Here is an example of how you could use the block-based method to layer multiple shapes on top of each other:
1 2 3 4 5 6 7 8 9 10 11 12 13 14 15 16 17 18 19 20 21 22 23 24 25 26 27 28 29 30 31 32 | |
And here is the result:
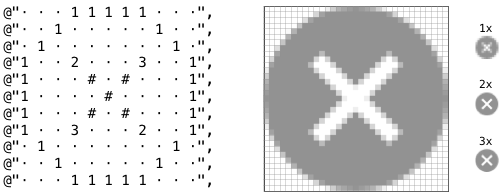
Here is now one that is pushing ASCIImage to its limits, but further shows how you can take advantage of layering basic shapes to create a more complex icon:
1 2 3 4 5 6 7 8 9 10 11 12 13 14 15 16 17 18 19 20 21 22 23 24 25 26 27 28 29 30 31 32 33 34 35 36 | |
ASCII art obfuscation! The method name gives it away. Sort of. Here is how the string is parsed, shape after shape, layer after layer:
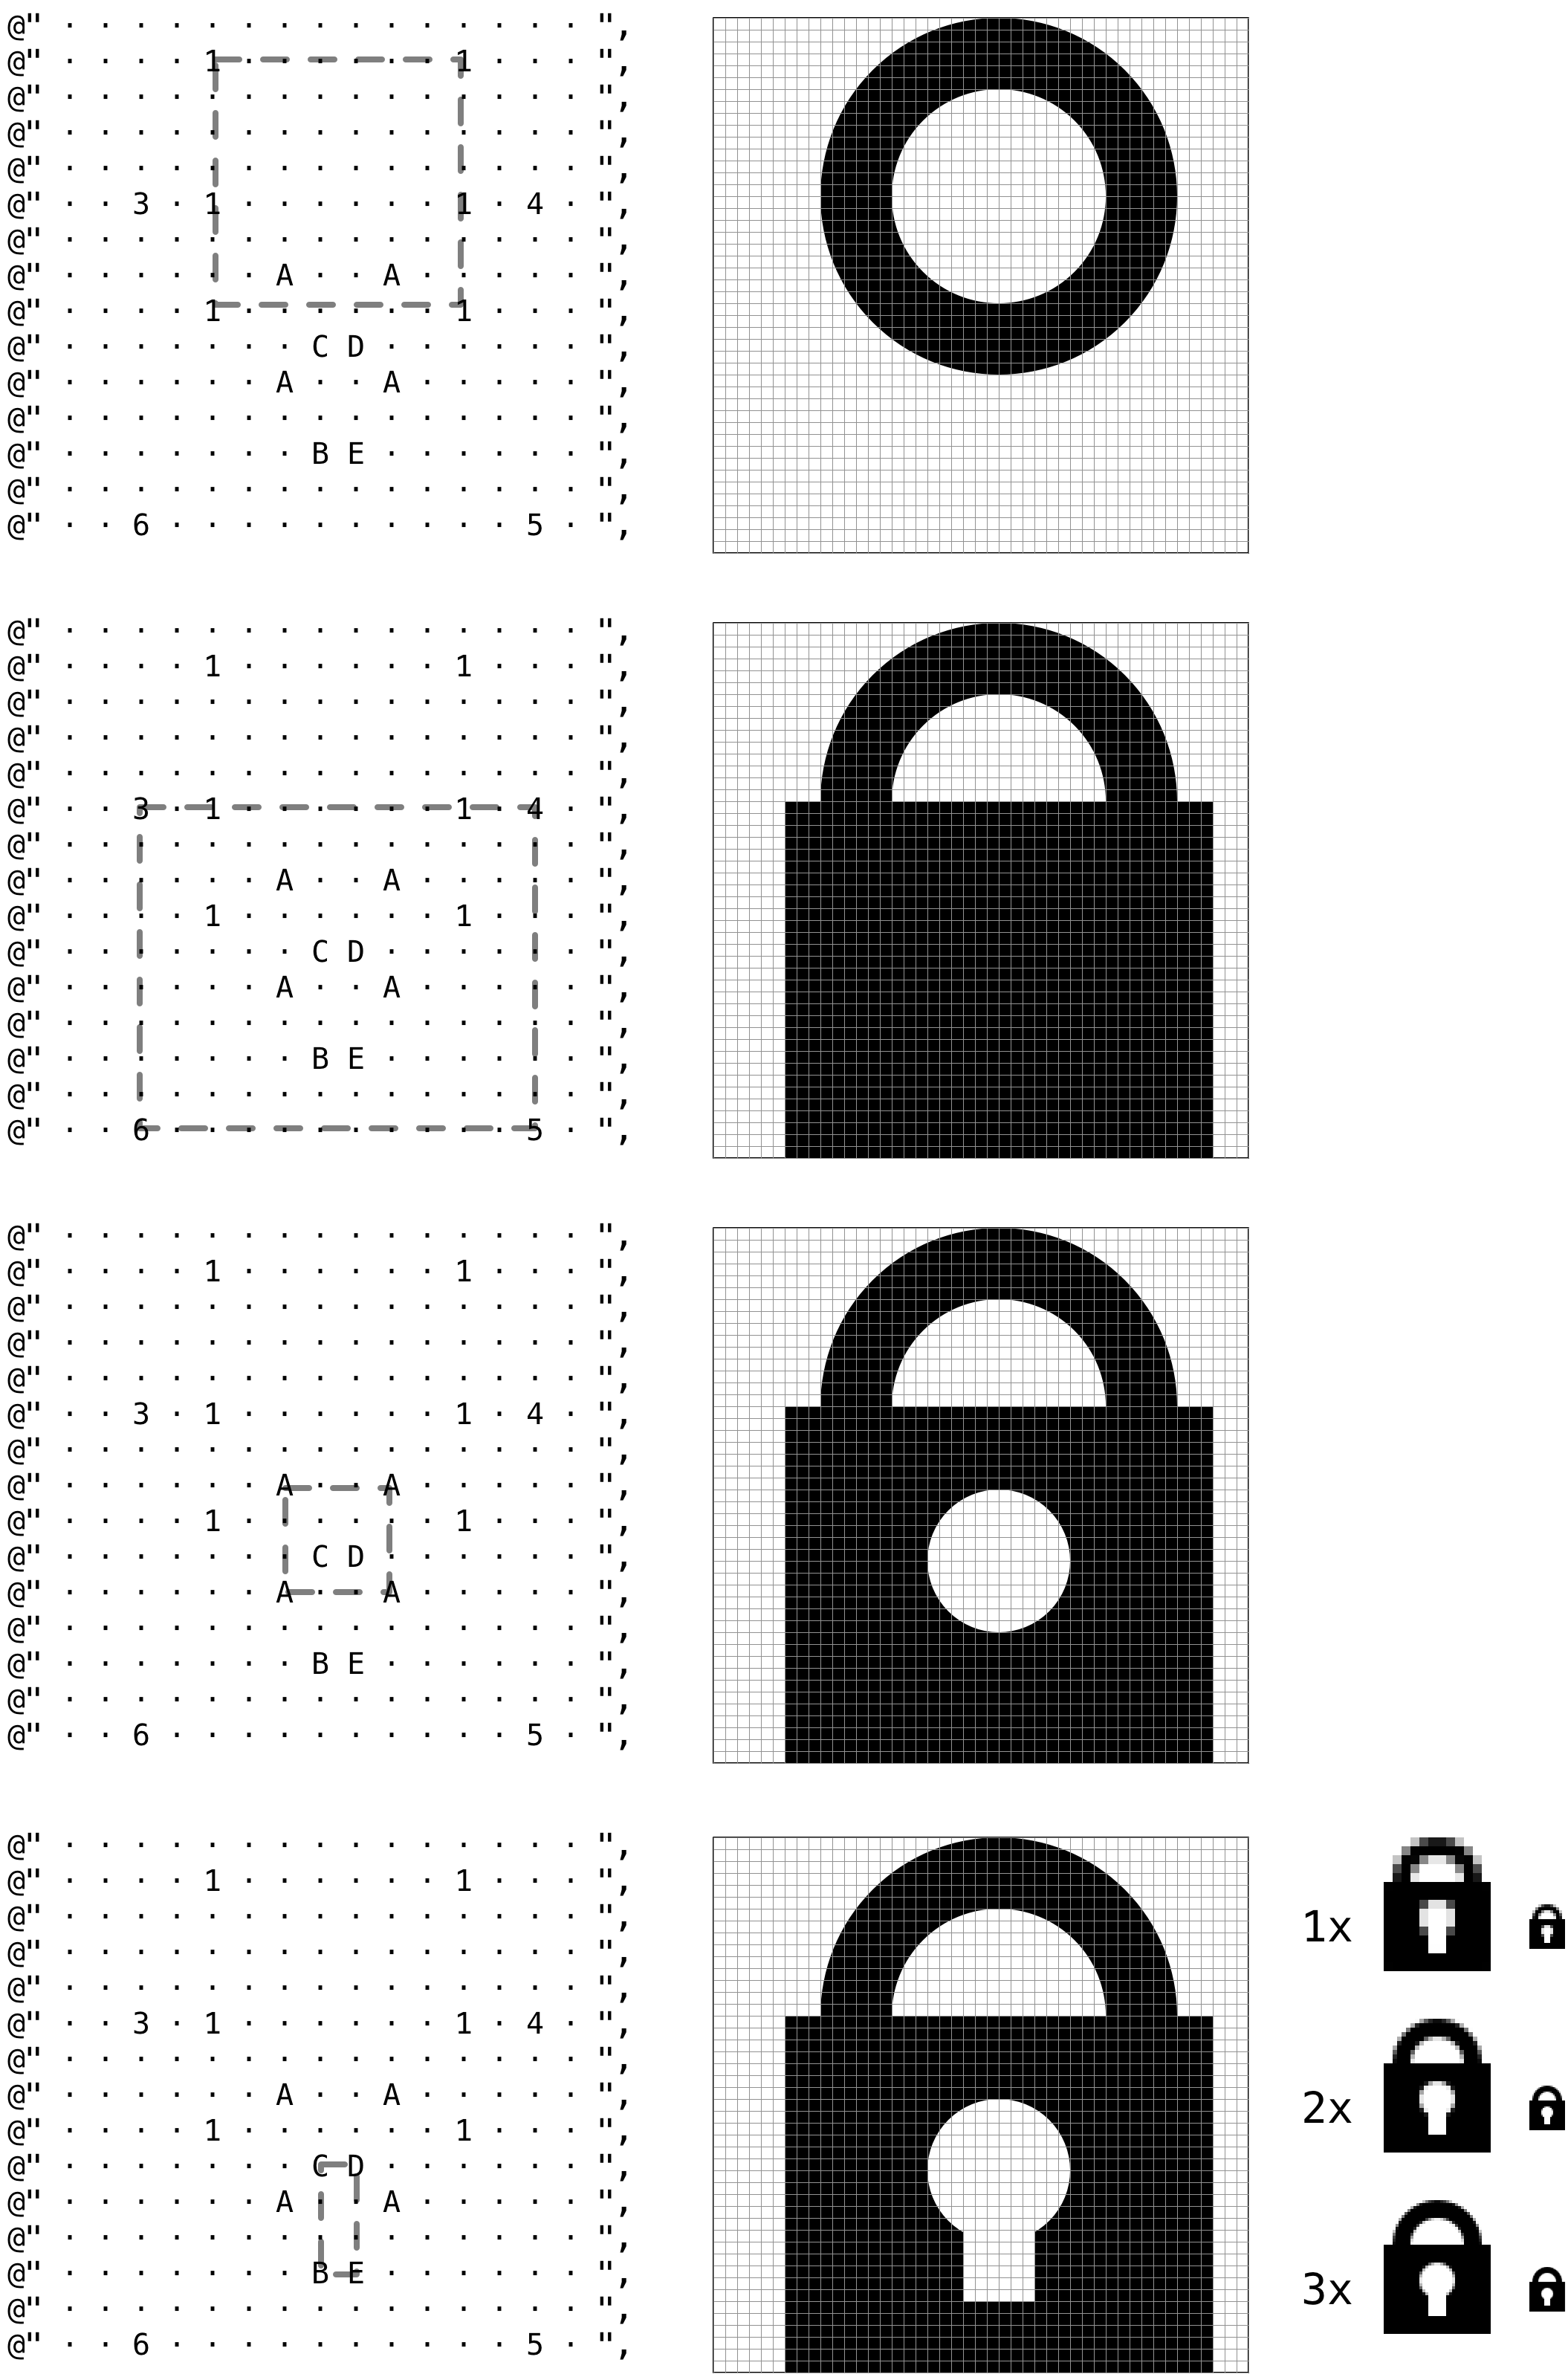
Again, not sure you’d want to go that far, but now you know you can!
Tricky Bits
Implementing ASCIImage was very straightforward, but there were still a few tricky bits:
- “Filling” out a shape actually involves both a
filland astrokeon NSBezierPath. To properly fill pixels and have proper pixel alignment, the vertices defining each bezier path are in fact set to the middle of the 1x1-pt “pixel” represented in the ASCII art (1 x 1 pt ends up being 3 x 3 pixels in 3x scale for instance). When filling the path, the edges of the bezier paths are thus drawn half-a-point away from the actual border. We then need to also apply a stroke of width 1-point, with the same color, to fill the full intended shape.

To really fill, you need to fill… and stroke.
- Without anti-aliasing, it is tricky to get the correct pixels to turn black. For this, I found that one should use a thicker line width for 45-degree lines, equal to the diagonal of a 1-pt square: the square root of 2. This width works fine for other angles, including horizontal and vertical lines, thus drawing of the lines is done using this width for aliased rendering, instead of the 1-pt width for anti-aliased rendering.
- For tests, one need to trick the system into believing that the scale is 1x, 2x or 3x. On iOS, ASCIImage has a special method with a scale argument, which is also used by the actual implementation (which simply passes the current device scale), ensuring that the same code path is in fact used. On OS X, it is trickier, in that the
NSImagehas to be rendered in a context where we control the “scale”. For this, the test actually renders the image returned by ASCIIImage into… another NSImage, with the correctly-scaled dimensions, so we get an artificial 1x context at a scaled-up size. - The scaling on iOS and OS X is handled differently. On iOS, the bezier paths need to be drawn directly at the right pixel size, and the Y axis is upside down. On OS X, scaling is implicit, and drawing is done using points, not pixels.
If you are curious, you can check it on GitHub and see for yourself!
Replacing Photoshop With NSString – Charles Parnot from NSConference on Vimeo